


What is a User Interface?
A User Interface (UI) is a graphical display where users can interact with a program. It is a means of communication between the human operator and the machine. Which means, the operator can input a command (through keyboard or mouse), the machine (CPU) processes these inputs and responds by displaying the results into the screen. All programs have User Interface, otherwise users will not be able to use and interact with them. In this Article we will get ourselves acquainted with navigating the Blender User Interface.
The Blender User Interface
Blender User Interface is composed of various areas called the Editor. These editors are interchangeable modules that handles different tasks in Blender. In order to be efficient, we need to familiarize ourselves with the UI so we know where and how to access the tools and features of the software. The figure below shows the layout of Blender User Interface by default.
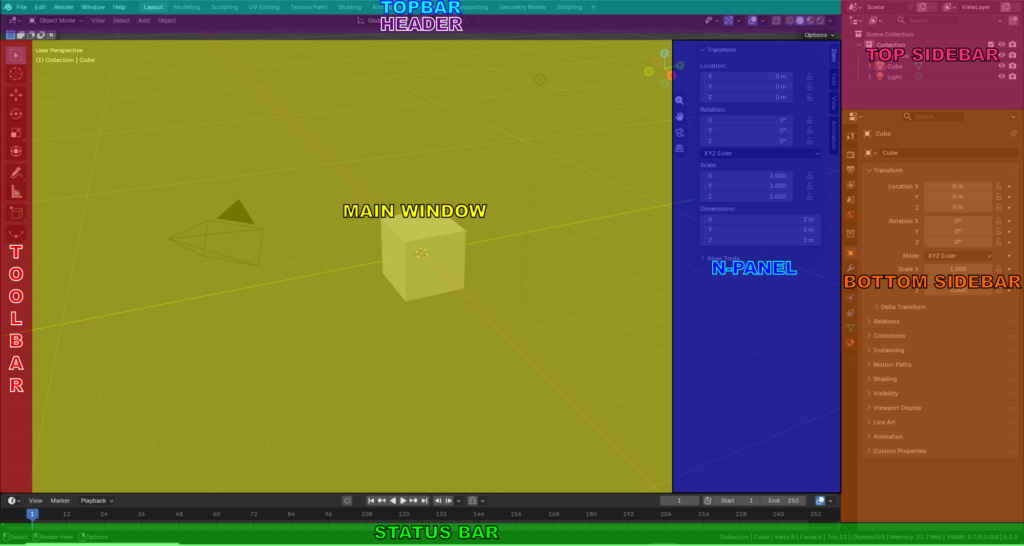
Figure 1. The Blender User Interface (UI)
The Top Bar
The Top Bar is the horizontal strip occupying the top most area of the UI. It contains the Main Menus and Workspaces
The Main Menus includes the File, Edit, Render, Windows and Help menus. Toggle the visibility of the Main Menu by right-clicking on any blank space on the Top Bar and clicking on the “Show Menu” checkbox.
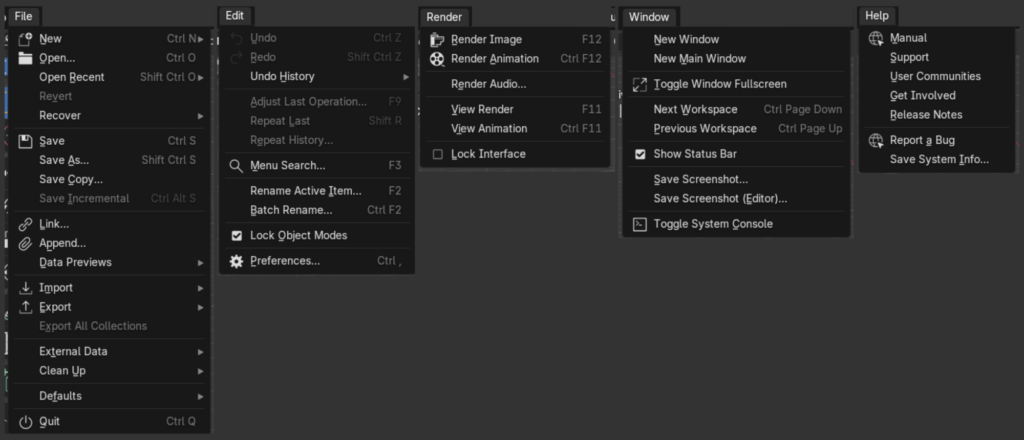
Figure 2: The Main Menus
Blender has predefined window layouts called Workspaces. These Workspaces corresponds to a specific task that can be performed in blender. These tasks can be modeling, sculpting, UV-Editing, Shading and etc. You can switch workspace layouts anytime by clicking its corresponding Tab in the Top Bar. You can also add your own customized Workspace by clicking the + icon next to scripting. If you wish to keep your custom workspace after adding them, go to the “File Menu”, “Defaults”, and click “Save Start up file”.

Figure 3. Shows the workspace strip in the Top Bar, the add workspace menu, and the Save Startup File from the Main Menu.
The Sidebars
The Sidebars are panels located at the right side of the UI. The Outliner panel occupies the Top Side bar while Properties Panel occupies the Bottom Sidebar, by default. The Outliner and Properties Panel are the most commonly used Editor Type because they contain data and properties of the viewport . Therefore, it is best to keep them visible at all times. You can also replace these panels with other types of Editor if you want to.
To change the Editor Type, click the top-left corner icon of the any window and choose from the selection available.

Figure 4. Editor Type Selection Menu. The same menus are available for each Windows and Panels in the UI.
The Status Bar
The Status Bar is a small horizontal strip that sits at the very bottom of the UI and It displays various information that can be useful at times. This information includes the following:
- Tool Guide and Hotkeys: When activating a tool, the Status Bar will display hotkeys or mouse click associated with the active tool. For Instance, pressing G (grab/move tool), will prompt the following response from the Status Bar. (see Figure 5 – A).
- Progress Bar: There are processes in Blender that takes time to complete like Rendering and Baking. In this instance, The Status Bar will display a progress bar to show that the system is still working (See Figure 5-B).
- Warning Messages: It alarms the user that an error has occurred or the task has failed (See Figure 5-C)
- Scene Statistics: When enable, the Scene Statistic will be displayed at the right side of the status bar (See Article: Setting Up Blender)
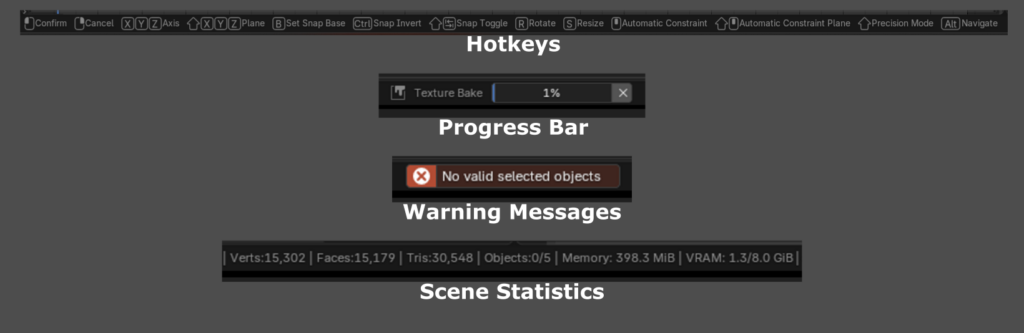
Figure 5. Status Bar Contextual Info.
The Toolbar
The Toolbar is located in the left side of the Viewport. This is where you can access specialized tools, functions and commands. In addition, each Workspace have different toolsets in the Toolbar. The toolsets automatically change depending on the Workspace that you are using. You can toggle its visibility by pressing T. If you are using MACHIN3tools addon, hover the cursor near the left side edge (where the toolbar is) before pressing T.
The Header
The Header is a small horizontal strip located in the top of a panel or window. This area contains menus and options that are specific for certain types of editors. Like the Toolbar, header menus can also change depending on the Editor Type that you are using.
The N-Panel
The N-panel contains the properties of the items in the viewport. This is also where you can access your add-on operators. Once add-ons are enabled, additional tabs linked to those add-ons will appear in this panel. In case you don’t know how to enable add-ons, check the our previous article: Setting Up Blender.
One of the important properties that you can find in the N-panel is the Transform. Transform refers to the location, rotation and scale of the items in the viewport. Most items in the viewport have transforms, even the 3D cursor. You will know more about transforms when we get into 3D modeling.
The Main Window
The Main Window is the largest region in the User Interface. It is mainly used for Workspaces. Similar to any other Windows, you can change the Editor Type of the Main Window. However, due to its large area, it is commonly used for General Editors like 3D Viewport, Shader editor or UV Editor. General Editors contain toolbars, submenus and panels that requires space for visibility and ease of access.

Figure 6. General Editors
Window Fullscreen Mode
Each Area or Window in the UI can be viewed in Fullscreen and there are two types of Fullscreen Mode: the Maximize and the Focus Mode.
- Maximize Mode: Shift into Fullscreen view without losing the Header, Status Bar, Tool bar and N-panel. This mode allows you to have the largest possible view as you continue editing. Toggle this mode by hovering your mouse over the area, press and hold CTRL then tap the Spacebar.
- Focus Mode: Shift into Fullscreen view without all the other components. This mode allows you to view items without distraction. Toggle this mode by hovering your mouse over the area, press and hold CTRL and ALT then tap the Spacebar.

Figure 7. Window Fullscreen Mode. The Maximize Mode (Left), the Focus Mode (Right).
Splitting the Main Window.
Blender’s Default UI layout provided us with enough windows to work with. But, if necessary, it is possible to add more areas or windows by splitting the Main Window. You can create as many window as you like given that it all fit into your screen.
To Split the Main Window, click the “View” menu in the 3D viewport header, then click “Area” on the bottom of the list to see the menu options.

Figure 8. The Area Menu
The Quad view divides your 3D viewport into four quadrants. However, this can only be done in the 3D Viewport Editor. Therefore, you cannot change the Editor Type of any quadrant in this view. This is useful for sculpting and image-based modeling because it provides the three orthographic (Front, Side Top) and one perspective view. And of course, you can reposition your model to any views you want on each quadrant. It allows the user to simultaneously inspect the scene in all possible views. To switch to Quad View, Press and hold CTRL and ALT, then tap Q.

Figure 9. The Quad View
More Ways to Split Windows
Other options that we have are the Horizontal and Vertical Split. Its self-explanatory, you divide your window either horizontally or vertically. But the advantage of these two options is that the resulting area is interchangeable with other Editor Type unlike the Quad View.
Alternatively, you can also hover your mouse pointer to any corner of the viewport until the cursor changes to a crosshair icon. Then, left-click and hold while dragging your mouse towards the center of the viewport to create a new window.
If you already have multiple windows, you can use the Area Edge Options. This context menu pops-up right at your mouse cursor. To bring up the menu, hover over the boundaries between two adjacent windows and wait until your mouse pointer turns to a left-right arrow icon, then right-click and the menu will appear.
Other than the Vertical or Horizontal Splits, Area Edge Options also allows you to join areas. Joining areas is used to reduce the number of windows in the UI. You can merge any areas in the UI, including the default ones. To merge windows together, click Join Right/Left for vertical splits and Up/Down for Horizontal splits.
Lastly, click Swap Areas to switch the position of the two adjacent windows.

Figure 10. *Click drop-down arrow to view details*
A. Crosshair Cursor at window corner to begin Window Split
B. Area Resize Cursor while adjusting Window size.
C and D. The Area Edge Options
I hope you learned something new about Blender User Interface. In the Next article we will discuss in depth the 3D viewport as preparation for 3D modeling.